The Wall Editor
The Wall Editor, is found on the top menu under 'Level' -> 'Wall Slots', or by pressing + W, or by choosing the “W” in the editor toolbar.

- The tabs allow the designer to view 16 walls at a time. Please note that there are only 16 colors used to represent walls in the editor. For example, walls 2, 18, 34, and 50 will all use blue.
- Icons to represent the walls are here, with black rectangles representing blank walls. The icons are created on the fly by the editor.
- These buttons control what if any spells or keys will unlock a locked door
- The designer may choose any of the levels of blockage for each wall slot.
- These buttons determine whether the graphic will get the wall, door, or overlay distinction, respectively. Each slot may use any or all of the types.
- Blending allows the engine to to use Alpha Blending to blend the overlay with the wall. This is where the designer can choose how much blending, if any and whether the wall or the overlay is the top-most layer.
- If the designer wishes to use custom area art, this is the button that allows it to be applied.
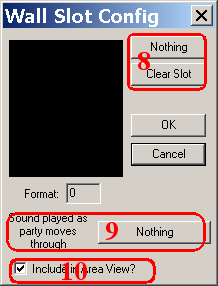
- Clicking this button brings up the dialog to choose a graphic for this wall slot, while the other button clears any graphics from the slot.
- If the designer wishes for a sound to be played as the party moves through the wall, the sound is chosen with this button. This would be used, for example, when the party steps through a doorway.
- This checkbox determines whether the player will see this wall in the Area View in game.
Back to Editors in Action
Back to Designer's Guide Index